Showing posts with label Free Crochet Pattern. Show all posts

Wednesday, October 17, 2007

Tweedle-Dee Bag

As promised, here be the instructions for making this bag. Enjoy!


Skill Level


Materials

Approximately 350 yds Bulky weight yarn

Crochet Hook Size L / 8mm
25” Pre-made Purse Strap
2 Magnetic Purse Snaps
Fabric for Lining (optional) – 1/2 yard

Matching Thread for Lining
3 Large Wood Buttons (or embellishments of your choice)
1 Sheet Plastic Canvas

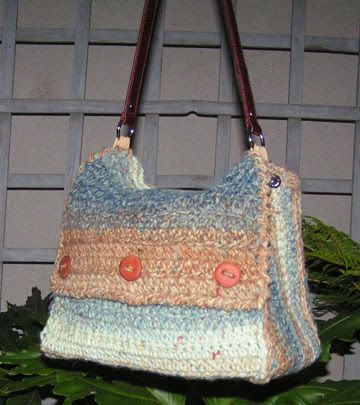
The bag in the picture was made with Moda Dea Tweedle Dee in Ocean Breeze and an ‘Exclusively You’ purse strap. Buttons were handmade by a local artisan. For the lining fabric, I chose a sturdy poplin to add body to the purse.

Special Stitches
Extended Half Double Crochet (ehdc): YO, insert hook in st indicated, YO and pull up loop, YO and draw through one loop, YO and draw through remaining 3 loops on hook.
InstructionsBag is made in one piece.


Notes
Monitor ending rows to ensure last rows result in the same crocheted edge appearance.

Front
Ch 30.

Row 1: 1 ehdc in 2nd ch from hook and in each ch across. (29 sts)


Row 2: Ch 1 loosely, turn. 1 ehdc in each ehdc across.

Repeat row 2 until piece measures 9 inches. Fasten off, weave in ends.

Sides and Bottom
Ch 25, 1 ehdc in each ehdc across front section.

Next Row: Ch 26, turn. 1 ehdc in 2nd ch from hook and in the next 29 ehdc, 1 ehdc in each ch to end. (79 sts)

Continue in pattern for 5 inches. Fasten off, weave in ends.

Back and Front Flap
Skip the first 25 sts of the side. Join yarn with a sl st to the next ehdc. Ch 1, 1 ehdc in the same sp as the last sl st, 1 ehdc in each of the next 28 sts, turn. Leave remaining sts unworked.

Continue in pattern for 16 -17 inches for a longer flap (as in photo) or 13 - 14 inches for a shorter flap.

Finishing
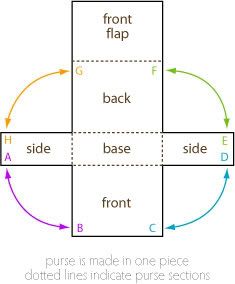
Reference the diagram below and sew sides to front and back sections. (I slip stitched the sides together and slip stitched across the side top edges.) Finish off, weave in ends.


With RS facing, reverse sc around edges of front flap. Finish off, weave in ends.

Attach magnetic snaps according to the diagram below. If your snaps do not include a metal washer, cut a small piece of heavy fabric to place on the back side to stabilize the snap.
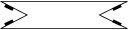


Make loop holders for the purse strap by either crocheting small strips or using your lining fabric. Sew to the middle of the sides between snaps. Be sure to loop around ring of the purse strap before you sew.

Line and embellish as desired! Cut a piece of plastic canvas to the length and width of the bottom section to use as stabilizer.


The fine print: Copyright 2007. Feel free to make these for yourself, as gifts, for charity bazaars or craft shows to supplement your income. You may not use this pattern for large-scale commerical profit. Do not distribute this pattern outside of providing a link to this site.

Sunday, July 01, 2007

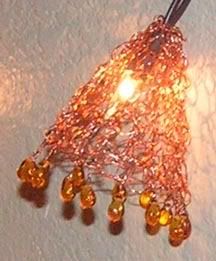
Pain In The Butt Party Lights [Wire Is Not Yarn]

One of the challenges at CFL for July is to make something you'd find at a party in any fiber. I know. I made up the challenge. You'd think I'd pick something I already had in mind ~ kind of a perk, ya know? Hah!

I've always pondered making the
Excruciatingly Painful Party Lights, and I thought, 'hey, these would be perfect. I'll just work up a crochet version!' Ah-HAH!

Well, lemme tell ya. Crocheting with wire is a real treat. First, your fingertips get sore as all get-out. Then, there's gaining mastery over the wire. Word of advice ~ wear band-aids and if your wire doesn't come on a spool, put it on one! I'm sure I would have found this advice on the net if I had taken a second or two to look. Oh, and don't use your nice wood hooks. Grab your least favorite Boye or Bates. I didn't make that mistake, but after wrestling with the wire, that thought did occur to me.

Once I got the knack of it, it started to go a whole lot better. Well enough so that I'd post the instructions for others to give it a whack. So here you go!


Pain In The Butt Party Lights


Materials
26 gauge wire in your choice of color
Teardrop shaped beads
1 String of Mini Lights (I'd recommend a string of 10 or 12 if you can find them, not the strand of 35 that I bought!)
Size H / 5.0mm hook
Soothing music

Ch 23.

Row 1: Ch 2, 2 dc in 1st ch, dc across to last ch, 2 dc in last ch; turn.

Row 2: Ch 3, dc in 1st dc, dc across to ch-3, 2 dc in ch-3; turn.

Row 3: Repeat row 2, finish off leaving a long tail.

Finishing

Sew seam. With ending long tail, sew up seam. With both tails together, make a few tight twists. Cut wire and discretely tuck in end.

Stretch to shape. Stretch your piece both lengthwise and widthwise. Shape into a cone shape.

Add beads. Cut another piece of wire about twice the diameter of the bottom of the cone shape. thread a bead onto the wire and give it a couple of twists. Thread through the last row of stitches. Continue in this manner until you have a nice bead edging.

Secure to light string. Cut a small length of wire and thread it through the beginning chain. Place your 'globe' over the base of the individual light. Pull up wire around the top where the string wire meets the light base. Twist the two ends together, cut and hide the end.


Personally, I don't know how Zabet Stewart got control of the wire with knitting needles. I am amazed no hook was involved. Let me know if you're brave enough to give this a go! LOL

Monday, June 04, 2007

Coffee House Placemats ~ Part 1

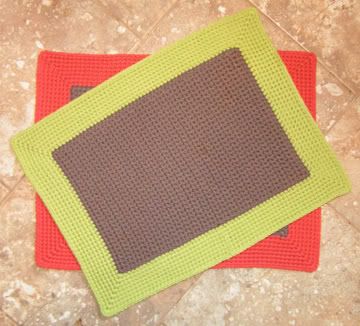
I made these to use on our patio table. The project is only half-done as there will be 2 more placemats with light blue and gold borders. If there is enough scrap yarn left, I might also make matching coasters to go with them. The colors remind me of Starbucks, hence the name. The SUPER simple patterns follow for these first two variations.


Materials

Lion Cotton Ease: 2 balls Taupe, 1 ball Lime & 1 ball Terracotta
Hook Size G / 4.5mm

Hook Size H / 5.0mm
Yarn Needle for weaving in ends


Size: Approximately 16 inches wide x 12-1/2 inches tall

Level


Gauge Swatch
4 rows of 7 sc across = 1 inch x 2 inches


Version 1
(Lime Border in picture)

With larger hook and Taupe, ch 32. Switch to smaller hook.

Row 1: Sc in 2nd ch from hook and in each ch across. (31 sc)

Row 2: Ch 1, turn. Sc in each sc across. (31 sc)

Rows 3 - 50: Repeat row 2. At end of row 50, finish off and weave in ends.

Border
Continue working with smaller hook

Foundation Row 1: Fold placemat in half width-wise to find the center st on the long edge. Join Taupe in this st and sc evenly to 1st ch; 3 sc in 1st ch, sc across to last ch; 3 sc in last ch; sc evenly across to 1st sc; 3 sc in 1st sc; sc evenly across last side; join to 1st sc. Finish off and weave in ends.

Row 2: Attach Lime to join in 1st sc of foundation row 1; ch 1, sc in same st and across to corner; *3 sc in corner st, sc across to next corner; repeat from * twice; end with sc across to beginning sc and join.

Rows 3 - 8: Ch 1, 2 sc in same sc as join; * sc across to opposite corner, 3 sc in corner sc; repeat from * twice; sc to last corner, 1 sc in same sc as start of round, join to 1st sc. At end of rnd 8, finish off, weave in ends. Block or steam iron to shape.


Version 2
(Terracotta Border in picture)

With larger hook and Taupe, ch 46. Switch to smaller hook.

Row 1: Sc in 2nd ch from hook and in each ch across. (45 sc)

Row 2: Ch 1, sc in each sc across. (45 sc)

Rows 3 - 36: Repeat row 2. At end of row 36, finish off, weave in ends.

Border
Continue with smaller hook.


Foundation Row 1: Fold placemat in half width-wise to find the center st on the long edge. Join Taupe in this st; ch 1, sc in same st; sc in each sc to last sc; 3 sc in last sc; sc evenly across to 1st ch; 3 sc in 1st ch; sc across to last ch; 3 sc in last ch; sc evenly across to last sc; 3 sc in last sc; sc in each sc to end; join to 1st sc. Finish off, weave in ends.

Rnd 2: Attach Terracotta to join. Ch 1, sc in same st and across to corner; * 3 sc in 2 nd sc of corner, sc across to next corner; repeat from * twice; end with sc across to beginning sc and join.

Rnds 3 - 8: Ch 1, 2 sc in same sc as join; * sc across to opposite corner, 3 sc in corner sc; repeat from * twice; sc to last corner, 1 sc in same sc as start of round, join to 1st sc. At end of rnd 8, finish off, weave in ends. Block or steam iron to shape.


Tips:
Finish your last rnd by using the Hidden Ends method of joining. This will make for a seamless join and a more finished appearance.

To keep from bulking up stitches when you weave in ends ~ or to prevent your ends from "popping up" through your work ~ split the plies of the yarn at least into 2 strands and weave them separately through different stitches.

This pattern has not been tested. Should you find an error, please share and I will update!

Enjoy!

Scrubbee Cloth

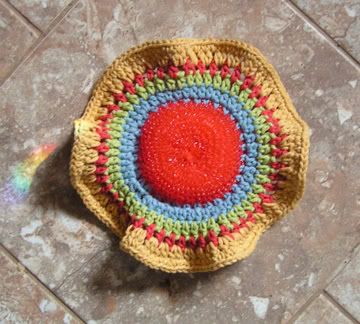
It started out as an MCAL at CFL ~ but it wasn't working for me. Either I was crocheting too tightly or my scrubbee was not equal in size to the one used to develop the pattern. So as all crocheters do in these cases, I modified it. This pattern is based on Kornflakes Scrubber Cloth.


Materials

Lion Cotton Ease: Small amounts of 4 different colors
(I used Lake, Lime, Terracotta and Maize)
Size G / 4.5mm hook
Nylon Scrubbee

Yarn Needle for weaving in ends

Level


Gauge: Who cares? It's a dish scrubber!

Instructions

Rnd 1: With Lake (color 1), join yarn to scrubbee, ch 1, sc in same sp, sc evenly around. Join to 1st sc. (I had 34 sc)

Rnd 2: Ch 2, *2 hdc in next sc, hdc in next sc; repeat from * around; join to beginning ch-2. Finish off, weave in ends.

Rnd 3: With Lime (color 2), join in any hdc in rnd 2; ch 3; *hdc, ch 1 in next hdc; repeat from * around; join to 2nd ch of beginning ch-3. Finish off, weave in ends.

Rnd 4: With Terracotta (color 3), join in any ch-1 sp in rnd 3; ch 3; *hdc, ch 1 in next ch-1 sp; repeat from * around; join to 2nd ch of beginning ch-3. Finish off, weave in ends.

Rnd 5: With Maize (color 4), join in any ch-1 sp in rnd 4; ch 2, hdc in same sp, ch 1; *2 hdc, ch 1 in next ch-1 sp; repeat from * around; join to beginning ch-2.

Rnd 6: Ch 1, sc in same sp and in each st around; join to 1st sc. Finish off, weave in ends.


I could have positioned the ruffling better, I basically just threw it on the floor and took a pic :P But isn't it neat how I got a matching rainbow?

Ciao for now!