Sunday, June 28, 2020

Copycat: Taco Bell Baja Blast Freeze

I have to admit I didn't particularly like these at first, but they grew on me until it was almost an addiction. The Powerade had no effect on me, but it could be because I'm old and tired :P But unless you have a Taco Bell that offers a 'Happy Hour', they can become a costly habit. Here's a decent copycat recipe:


Ingredients
One 12 oz. can Mountain Dew
4 oz. Powerade Mountain Berry Blast
Ice


Put all ingredients into a blender and blend until smooth. If you want to make a larger amount, just use the 3 parts Mountain Dew to 1 part Powerade ratio [3:1]. Alternatively, to keep from watering down the concoction from the get-go, blend the ice separately then pour the drink mixture over the ice.

Enjoy!


Saturday, June 27, 2020

Neverlost Bookmark

Similar in concept to the Thong bookmark, this one wraps around the book at the page where you left off.

This bookmark fits an average-sized hardcover book, but can easily be adjusted longer or shorter as needed. Just increase or decrease the 'normal' chain length.

A quickie project that can be added to a book for a personalized gift.

Stripe Dish Cloth

Dish cloths made with cotton yarn are great, but in my opinion, nothing beats thread. For one, they're not as thick so you can get into the nooks and crannies easier. Secondly, they dry out much faster so you don't end up with a 'sour' cloth sitting on your sink if you use your dish cloth longer than a day.

This pattern utilizes the granny stitch, so again, a simple cloth for beginners. The pattern also comes from Coats & Clark's Book No. 116, Gifts for All Occasions.

Personally, I like using a No. 7 hook instead of the No. 4 that is called out. I just prefer a tighter stitch. I still make a chain 17 inches long and work in pattern. Obviously, gauge doesn't matter - it's a dish cloth!

Enjoy!

Lady Fair Apron

A crochet pattern!

No, I haven't completely dropped the hook. I've just been in a crochet funk for a while. It happens. This is one of my favorite vintage patterns that I've made a few times because it just works up so pretty!

Variegated threads are difficult to come by anymore, but you can still find a store here and there that carries Aunt Lydia's in a limited number of variegated colors. If you just can't find what you're looking for, I'd recommend Handy Hands. They carry Lizbeth threads in just about any color and color combination you can think of.

This pattern is simple enough for even beginner / intermediate thread-crocheters.

Enjoy!

Thursday, June 25, 2020

Alpaca Trinket Dish

Alpacas or Llamas? You figure it out. Anyway, it's a cute little dish that can be used as a trinket or coin dish, soap dish or a scrubbee holder.


Horrible picture, I know, but it's the only one I have handy. It came out looking so much cuter than this!

I've seen similar dishes on Pinterest where they painted the animals white and distressed them for a French Shabby Chic look, but I thought these Alpacas / Llamas were cute enough just the way they were, so I didn't go there. Sheep would also be cute - pick whatever critter suits your fancy.

What You'll Need:
  • Small square snack dish (mine is 8" square)
  • 4 large plastic animals with long flat backs that sit / stand evenly
  • Hot glue gun and sticks
  • E6000 glue
  • Marker
You could probably use a dinner or luncheon-sized plate or a flat-bottomed bowl. You would just need to play around to see what works best with the animals you choose. I just thought it looked cute with their butts touching.

STEP 1: POSITION
Turn over plate and mark centers along the raised edge. Arrange the animals facing each direction. Place plate on top to determine the best contact points, aligning the center of the animals with your marks. 

STEP 2: GLUE IN PLACE
For quick set, apply a dab of hot glue to the animals contact points. Set dish on top. When glue is set, turn over and apply E6000 for the permanent set. Let dry completely before using.

DONE!
I'm using mine in the bathroom as a soap dish. I have weird things in my quasi-Steampunk-style bathroom (like a model of the Hindenburg flying over the toilet), so it fits in perfectly. 

TOTAL PROJECT COST - $23
Animals = $20 ($5 each) This is the cost without coupons
Plate = $3

SHOPPING GUIDE
Animals = Michaels
Snack Plate = Pier 1


Book Spine Bookmark

Guaranteed to last longer than any purchased bookmark!


What you'll need:
  • Old book
  • Purchased or handmade tassel
  • Eyelet and eyelet setter
  • Leftover piece of scrapbook paper
  • Contact cement
  • Exacto knife
  • Awl or Crop-A-Dile
  • Scissors
If you don't have an old hardcover book that you're willing to part with, you can pick one up at the thrift store. Find one with a fun title. I picked General Biology because there are ONLY 2 GENDERS / SEXES, no matter what the Supreme Court says!

A Crop-A-Dile can be found in the scrapbooking section of MichaelsJoann's or Hobby Lobby. If you have one, you can use it as both a hole punch and an eyelet setter. They're on the pricey side, so determine if this is a tool that you will use enough to justify the cost and don't forget to use those coupons!


STEP 1: Cut spine from book. I did this by first cutting the pages away with the exacto knife, then laying the cover flat and cutting along the edge of each cover. This leaves a flap of material on each side of the spine that you can fold over.

STEP 2: Glue the flaps down on the back side of the spine. Cut a strip of scrapbook paper to fit over the back and glue in place. Let set.

STEP 3: Using an awl or Crop-A-Dile, make a hole large enough for the eyelet to fit through. Insert eyelet and set.

STEP 4: Attach tassel.

DONE!

I picked up my used book at the Salvation Army for $1. All other items I already had.

Note Traps

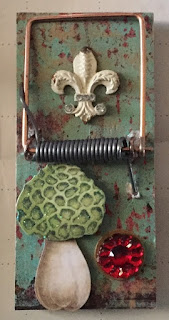
Have a need for something to hold notes? Use a rat or mouse trap!


The one on the left is a rat trap, the one on the right is a mouse trap. Remove all parts from the mouse trap, glue on some leftover pieces of scrapbooking paper, replace the metal trap (use strong glue like a 5-minute epoxy) and embellish as you like. Glue a magnet to the back, stick it on your refrigerator and you're done!

To use, just pull back on the top of the trap and insert your note!

Dry Erase Board

This one is so easy-peasy!


Here's what you'll need:

  • Lightweight Dollar Tree 8"x10" picture frame
  • 1 sheet of scrapbook paper
  • 5 neodymium magnets (if you want to hang it on your refrigerator, 1 magnet if you don't)
  • Dry erase marker with magnet on pen case
  • E6000 glue
  • Scissors or paper cutter
  • Any embellishments you want to add
These are much stronger than the regular black button magnets.
If you hang on the refrigerator, you need to use this type to keep the frame from sliding down.
Not even sure if instructions are needed, but here you go:

STEP 1: Remove back from frame. If you're going to hang it on the refrigerator, remove the stand or cut it down so it doesn't extend past the frame.

STEP 2: Cut the scrapbook paper to fit the frame. You can use the frame insert as a template. Insert the paper on top of the glass, followed by the inserts and ending with the reattaching the back.

STEP 3: Glue the magnets to each corner of the frame on the back. Allow the glue to set. Flip the frame over to the right side and glue another magnet to the side or bottom of the frame. This will be for your dry erase pen.

STEP 4: Add any embellishments or leave plain. Up to you! When the glue has completely set - about 24 hours - you can hang on your refrigerator. 

DONE!

TOTAL PROJECT COST: $9
Frame = $1
Scrapbook Paper = $1
Magnets = $4
Dry erase pen = $3 for set of 4

SHOPPING GUIDE
Frame = Dollar Tree
Scrapbook Paper = Hobby Lobby
Magnets = Michaels
Dry erase pen set = Walmart

Got an Old Lamp? Make a Birdbath!

I made these a while back. I picked up a couple of old lamps at the thrift store (cheap!), and the diffusers, 5-minute epoxy and lamp finials at Home Depot. Each birdbath came to about $25 all in. You'll want to use a lamp base that is fairly heavy so it won't tip over easily. I picked the acorn finial as it was taller than the others and completely hollow inside which allowed me to be imprecise about how much of the rod to leave exposed. Plus, it was brass which will last much longer than plastic. Once the epoxy sets, you won't be able to remove it without a lot of elbow grease and chemicals.


Simply take the lamp apart and remove everything but the base and the threaded rod. Depending on how the lamp is assembled, grunting may be required. Place a washer and bolt to secure the rod placement (should be part of the lamp assembly). Finger tight. You want to leave enough of the rod exposed for the diffuser and finial.

Slide the diffuser onto the threaded rod and screw on the finial - finger tight. Mix the epoxy and put all around the finial making sure you leave no open areas. The epoxy will serve as your waterproof barrier.

That's it! Now let sit for 24 hours before putting outside and filling with water.

Never lift the filled birdbath by the diffuser. It will break the glass. My neighbor learned that lesson the hard way. Change the water often or use a wiggler to keep the water moving so it won't become stagnant and draw mosquitos. We have enough going on with C-19, we don't need to add West Nile to the mix!

Escape from New York

If you don't care about what's going on in New York, you don't have to watch the video. Just stare at Snake Plissken. You're welcome.


Wednesday, June 24, 2020

The Chosen

This series about Jesus is unique in that it is completely crowd-funded. They've made Season 1 available for free (8 episodes) in both the Apple and Google app stores for your phone. I have the DVDs and can tell you that the series, so far, is Biblically accurate minus for very minor deviations that have no bearing on the overall message.

Here is the newest trailer for Season 1:


The Roman soldier's voice sounds like Q from Star Trek: The Next Generation. Whenever he's on the screen, I have to work hard at not seeing Q. Needless to say, I had to research. Sadly, the actor is no relation to John de Lancie, but he could easily take over his character in future movies, if we ever have any more.

Original Trailer


The first 3 episodes are currently available on YouTube in case you want to view on your TV. If you like what you see, you can purchase the DVDs here. I promise, it's a keeper! And if you really like what you see, you can also donate to get Season 2 finished.

Enjoy!

Tuesday, June 23, 2020

To Infinity and Beyond!


Israeli spacecraft moves to forefront in NASA Neptune mission


A Weizmann institute-designed spacecraft is in the running to be chosen by NASA for a 2026 mission to Neptune.
By Lauren Marcus, World Israel News
A Weizmann Institute-designed spacecraft is in the running to be chosen by NASA for a mission to Neptune. The craft, named Trident, has received over $3 million in funding to enable researchers to search for signs of life and study the atmosphere and oceans of the planet Neptune’s moon, Triton.
After last July’s crash landing of the Israeli aircraft Beresheet on the moon, the Neptune mission may be the Jewish state’s attempt at redemption in space exploration.
Trident was chosen from 22 competitors and is currently one of four projects remaining in the final stage of selection. NASA will choose two crafts for the 2026 launch. The craft are expected to arrive at Neptune in 2038.
One of the critical features above the Israeli craft is a hyper accurate clock, built by Jerusalem based firm Accubeat. The clock, which loses less than one second every million years, will be able to record, measure, and transmit data about Triton’s atmosphere.
Professor Yohai Caspi of the Weizmann Institute’s Earth and Planetary Sciences Department spoke about the project’s goals with ILTV News. One of the main aims of the mission will be investigating Triton’s subsurface ocean.
“The spacecraft will be measuring the thickness and mass of this ocean,” said Kaspi.
“Moreover, in some places, this ocean spills out. We have geysers that are going from the interior to the atmosphere, which is carrying the material around, and that’s something we’ll be measuring with the spacecraft.”
To the delight of those who are curious about life on other planets, Kaspi directly alluded to the possibility of finding life forms within Triton’s deep oceans.
“It might even have life in it. We have life very deep in the oceans on Earth, where there’s no sunlight, so maybe there’s a similar state on this moon,” Kaspi said to ILTV News.
Kaspi also explained that Triton’s atmosphere is another main focus for investigation.
“We’ll be learning about a very unique atmosphere that hasn’t been observed before on any other moon in the solar system.”
But it’s not just the moon’s atmosphere that makes it unique. Triton spins the opposite direction of Neptune, suggesting that it likely did not originate in Neptune’s system. So in studying Triton, Kaspi said, “We’re actually learning about an object from outside our solar system.”
“This is something very new.”
This article appeared first on World Israel News.

Monday, June 22, 2020

Don't Mess with the Big Babu!

CHINESE TROOPS IN 'PANIC MODE' AFTER BORDER CLASH WITH INDIA
Steven Green 
June 22, 2020 1:38pm EST

Chinese troops were reportedly in “panic mode” after a recent border clash with Indian troops high in the two nations’ disputed Himalayan border area.

The two countries share a largely undemarcated and sometimes disputed border in the Himalaya mountains, where the peaks can reach 28,000 feet. While the area has been largely quiet in recent years, the two nuclear-armed powers have engaged in sometimes-deadly border clashes since May 10.
The Sunday Guardian report details the most recent fighting, in which China’s PLA land forces may not have acquitted themselves very well:
Inputs accessed by The Sunday Guardian post the debriefing of these 10 men, revealed that the outnumbered and “unarmed” (as the rules required them to be) Indian troops, rather than retreating in view of the huge number of Chinese soldiers, grabbed the improvised clubs and rods that the Chinese were using to batter Indian soldiers, and used the same to kill “at least” 20 Chinese soldiers and officers at patrol point 14.
“This was one reason for the high morale of our troops who came back to us on Thursday. Our men were captured after they chased the Chinese into their area of domination, with the intention to kill them after hearing of the loss of their CO, Colonel Santosh Babu. The Chinese soldiers, seeing the unexpected attack from our men, started fleeing and running back to their area and were followed by our men, who were then captured”, the official stated.
The debriefing of the 10 men has also revealed that the Chinese soldiers were in a state of shock and fear after the Indian soldiers replied with “sheer fighting force” to the treacherous attack by the Chinese. During the next 60 plus hours, the Chinese soldiers were highly anxious about a possible retribution from the Indian side and were in “panic-mode”.

Sunday, June 21, 2020

Quickies: Trinket Box & Small Vase

Still catching up on completed past projects. Here are a couple that don't take up a huge amount of your time. Perfect for those moods when you just don't want to spend the day crafting.

In case you're curious, the doily appearing in these project phots is the Gift Doily made in Aunt Lydia's size 10 thread in white and ocean. You'll find the link to the pattern under Crochet Freebies in the sidebar.

Quickie #1: Trinket Box


What you need for this project:
  • 1 small wood box with lid
  • Scrap piece of scrapbooking paper
  • Chalk paint in coordinating color
  • Matte Finish Mod Podge
  • Sandpaper
  • Scissors
  • Paint brush
I had purchased a small item as a Christmas gift (yes, I'm already there) and didn't want to put it into a plain gift box. I found small wood boxes at Dollar Tree and decided it would do with a touch here and there. After removing the plastic wrapping, I saw that the wood was quite rough in spots. What do you want for $1 anyway? I remedied that by taking the sandpaper to it and that took care of it. There. Smooth and good to go.

STEP 1: APPLY PAPER
Cut a strip of scrapbooking paper to go around the bottom of the box, ensuring the paper will extend slightly beyond the top and bottom edges. Apply a coat of Mod Podge all around the sides. Starting in the back, apply paper making sure it extends beyond the top and bottom edges. Apply Mod Podge to the inside of the paper to glue it down at the seam. Finish by applying another coat of Mod Podge all round covering the paper entirely. Set aside to dry.

STEP 2: PAINT LID
Apply 1-2 coats to the lid, allowing to dry completely between coats. Set aside to dry.

STEP 3: FINISH BOX BOTTOM
Holding bottom edge of box toward you, sand along edges to remove excess paper. Not only will this give you a clean edge, it's a cool way to avoid having to cut your paper exactly to size. No need to fret about that from now on!

STEP 4: FINISH LID
You can either leave the lid painted as-is or Mod Podge a piece of scrapbooking paper to the top as I did. Up to you. In hindsight, I think I would have just left the lid painted. Again, up to you. Either way, finish off with a coat of Mod Podge so the finish on both pieces is the same. Let dry.

DONE!
If you're using the box as a gift box, you can wrap twine or ribbon around the box. Otherwise, your box is ready to store your favorite trinkets.

TOTAL PROJECT COST - $1 for the box. I had everything else.


Quickie #2: Small Vase

Yes, it says "Monkey Farts".
And no, I don't know what monkey farts smell like (rotten bananas maybe?),
so I have no way of knowing if the smell is accurate.
What you'll need for this project:
  • 1 set Dollar Tree salt and pepper shakers
  • Chalk paint in desired color
  • Wax
  • Small amount of jute twine or ribbon
  • Scrap pieces of greenery or florals
  • Paint brush
  • Sand paper
  • Scissors

Most of us have collections of some sort. Collections can get boring to look at if all you have are different styles of the same thing displayed. To make your collections more interesting to look at, you need to inject other items into the vignette. This sweet little vase can definitely fit that bill. And since the shakers come in a set, you can make 2!

You should know the routine by now, but here we go:

STEP 1: PREPARE BOTTLE
Wash and dry thoroughly. Toss the lids or save them for some other project. You never know.

STEP 2: PAINT BOTTLE
Apply 1-2 coats of paint, as needed for coverage, allowing to dry between coats. End with applying a coat of wax. Allow to dry overnight, then sand raised edges to distress.

STEP 3: FINISH
Wrap some jute twine or ribbon around base of threaded area of bottle and tie with a square knot. Insert pieces of greenery and flowers.

DONE!
Your sweet little vase is ready for display.

TOTAL PROJECT COST - $1 for the salt and pepper shakers. I had everything else.


And there you go. Have a wonderful Sunday!

Saturday, June 20, 2020

Our Fearless Moron Speaks

Our Idiot Governor Gavin Newsom, (yes, that's his official title), has evidently decided that things were going too well in CA and he just couldn't have that. He announced on the 18th that the wearing of masks in all public places - both indoors and out - is now mandatory. This flies in the face of even the Evil Dr. Fauci who indicated that the wearing of masks is mostly symbolic.

Just watch until you hear the Pat Screech - about 8 minutes in

You can read / download the new conditions here.

I did manage to find some humor in the exceptions area. If you have a medical condition that makes wearing a mask difficult or impossible, they indicate that you should wear a face shield. So let's all dress up like we're extras in Demolition Man, shall we?


I went to the doctor last week for my bi-annual lab work that I have to do. I was accosted by several people as I was about to enter the building. One person stopped me to take my temperature and slapped a sticker on my sleeve indicating that I was 'OK'. Another person stopped me because I wasn't wearing a mask and made me wait while another person gave me one to put on. All through the area were huge, tall signs posted informing me of the virus and what I could do to keep from catching it or spreading it. (Like we haven't been inundated with this news 24/7 for the past several months.) I, of course didn't read any of them. Needless to say, it was a long gauntlet to run through before I actually got to the door.

Diversion: Learn About Gauntlets

When I went to check in, I had to answer a series of questions. 'Have you had the virus?', 'Have you been around anyone who has the virus?', (How would I know?), 'Do you have difficulty breathing?', 'Have you had a fever?', etc. Confess, proletariat! I was sooo tempted to respond with "2+2=5" and "I love Big Brother", but got control of myself. Instead, I just rolled my eyes and told her anything I've experienced was not associated with any virus. The girl sitting next to her giggled.


While I was sitting in the waiting area, a young girl sat across from me who was wearing both a cloth mask and an acrylic face shield. The mechanism used on the face shield for keeping it on her head was an elastic band. The shield itself was wide open at the top, bottom and sides, so it would only protect her from a direct spew-blast to the face. Plus her mask and shield were color-coordinated in a pretty pink pattern. Quite stylish, (I guess).


This song ran through my brain as I was looking at her

Anyone taller than her or standing to her side could spew down / over and still infect her through her eyes. She was not a tall person and I had to really work hard to not laugh out loud at her overreactive silliness. But that's just me. I have a habit of seeing silly and / or irrational human behavior everywhere I go. Then I have to stop and ask God for forgiveness as I repent and continue to work on my cynical and sarcastic view of the world.


Friday, June 19, 2020

Some of My Original Crochet Patterns

These are some of the patterns that I used to sell on Ravelry until they got stupid. A couple of them were posted before, but they weren't made available as downloadable PDF files. To download, just click on the download icon under each document.


I have more patterns, but they were originally on my old Mac and I copied them to CDs before I cleared it for recycling, so more later!

Bottle Strap Holder

I can't begin to tell you how many of these I have made over the years. They are so good for carrying a bottle around any outdoor venue. Keep this one handy!

Better Poop Bag Holder

Cuter than the last one I posted, but still easy to make : )

Travel Cloth

A simple cloth to make, but quite handy to take on camping trips or wherever you need both a cloth and a bar of soap!

Retro Dish Mop

This was rewritten in modern terminology from a vintage pattern. Since it's made with cotton thread, it's a great mop to use for those kitchen dishes.

Puff Flower Spa Cloth

Easy, but pretty, ample-sized washcloth. Can be made up in an afternoon!

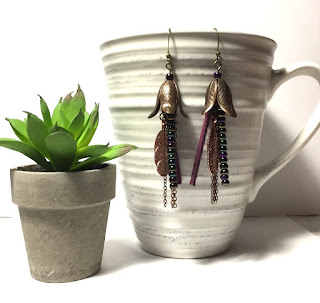
Earrings - No Tut, Just Pics

A while back I got on an earring making binge. I do this. I'm all into one type of craft for a while, get bored and switch to another. That was the case here. So here are pics of my earring binge. I did make the earring tree that appears in the last pic. If you're interested, I'll post the tut - just let me know in the comments below.

All jewelry supplies were purchased at Joann's.


Thursday, June 18, 2020

2-Fer!

Last post for the day!

Because I do the layout for our mobile home park magazine, I spend a lot of time on Pinterest looking for craft projects to include. Because we've been locked up due to WuFlu, I've also spent a lot of time on YouTube watching crafting videos - so you had to know a lot of crafting posts were coming.

Here are 2 new projects for you!

Click to enlarge

PROJECT #1: FRAMED FLORAL DECOR
For this project you will need:
  • One 8"x10" artist canvas
  • One plastic sink mat
  • White chalk paint
  • 1 Flower pick
  • A small amount of jute twine
  • Flat head screwdriver
  • Paint brush
  • Staple gun and staples
  • Scissors
  • Wire Cutters, as needed
       

I found this small light-duty staple gun at Hobby Lobby in the art / paint section of the store. The regular price was $10.99, but because I always travel with my craft store apps on my phone, I was able to use the 40% off coupon and scored it for $6.60. Since it's light-duty, it's perfect for crafting use and I don't have to drag out the mondo staple gun, (that hurts my wrist), that is better suited to household use or re-upholstering furniture. I'm sure you can find a light-duty staple gun at Home Depot or Lowe's, but they never have coupons and you may get real old waiting for them to go on sale. Anyway, I was anxious to try it out and this project seemed perfect for that. This particular staple gun uses #3 staples. I purchased 5/16" long staples and they worked fine.
Click to enlarge
Chalk paint comes in either brush-on or spray paint forms. If you're really bored, you can try making your own. I'm way too lazy for that. If you either don't have a Walmart near you or you despise shopping at that store as I do, all craft stores sell chalk paint. But be forewarned, their selections are usually quite picked over. Home Depot also sells it in spray form, as I'm sure does Lowe's. But again, no coupons.

Hobby Lobby Tidbit: If it's not on sale for 50% off this week, it will be on sale for 50% off next week.

Coupon Phone Apps: All craft stores have apps that you can download to your smartphone that include a menu selection for all of their current coupons. If you don't use a smartphone, you can always print out the coupons from their websites before you go. Never ever pay full price unless you just can't wait.

OK - enough yapping. Let's get started.

STEP 1 - PREPARE CANVAS FRAME
Remove the canvas from the frame. The frame is made of pretty soft wood, so some of the staples were a bit embedded. I used a flathead screwdriver to pry them up and out. Toss the canvas unless you have some other use for it.

STEP 2 - PAINT THE FRAME AND SINK MAT
I applied 2 coats to the frame and 3 coats to the sink mat, letting the paint dry completely between coats. No need to paint the back of either unless you are more anal retentive than I am.

STEP 3 - ATTACH THE SINK MAT TO THE FRAME
Turn the frame upside down and staple the mat to the frame (painted side down). I recommend starting at the top center, then bottom center, followed by side centers. Then corners and fill in until the entire mat is taut and evenly stapled all around. End with trimming off the excess mat.

STEP 4 - ATTACH THE FLORAL PICK
Position the floral pick on the sink mat, trimming the stem as needed, until you are happy with the placement. Wrap jute around stem a few times and finish off with a cute little bow. Hot glue the pick to the sink mat.

DONE
Hang or place your new masterpiece!

Note: If I were to make this again, I think I'd use spray paint instead. Painting the sink mat was kind of a pain in the butt trying to keep the paint strokes from [obviously] showing.

TOTAL PROJECT COST (not including tools and paint supplies) - $3.99
Canvas Frame - $1
Sink Mat - $1
Floral Pick - $1.99

PURCHASING GUIDE
Artist Canvas, Sink Mat = Dollar Tree
Waverly Chalk Paint = Walmart
Flower Pick = Hobby Lobby


PROJECT #2: TEA BOTTLE VASES
For this project you will need:
  • New Leaf 'Tea House' or 'Organic' Collection bottle(s)
  • Mineral spirits or Goo Gone
  • Chalk paint in desired color (I used Folk Art Home Decor Chalk Paint in Sheepskin, French Linen and English Lavender)
  • Paint brush
  • Cardboard from a cereal box
  • Jute twine, scrapbooking paper or whatever you want to finish the top
  • Assorted greenery picks
  • Hot glue
  • Scissors


I have a shelving unit in my master bath that needed some sprucing up. I've recently become a bit addicted to the specialty New Leaf teas which happen to come in tall glass bottles. I liked the shape of the bottles and decided they would make cute (and cheap) vases to suit my purpose. You don't have to run out and buy any tea just to get your hands on this bottle, (although I'm very fond of the Black Tea with Lemon and Honeysuckle). Any tall or pretty shaped bottle that strikes your fancy will do just fine.

The labels were easy to peel off in one piece, however removing the adhesive that was left behind was a wee bit challenging. I tried soaking in soapy hot water - nope. Acetone - nope, that just smeared it around. I didn't have any Goo Gone handy, but I did have some mineral spirits and Bingo! I don't know what adhesive they use, but I want some!

OK - let's go.

STEP 1 - PREPARE BOTTLE(S)
Remove labels and adhesive, then wash and dry.

STEP 2 - PAINT BOTTLE(S)
Apply 2-3 coats for complete coverage. Let dry completely between coats. No need to paint the screw top area as you will be covering it up in Step 3.

STEP 3 - CREATE BOTTLE TOP COVER
Measure screw top area of bottle and cut a strip of cardboard to cover. Wrap strip tightly around the screw top and glue closed. Remove cover and finish with your embellishment of choice. Slide finished cover onto bottle.

STEP 4 - INSERT GREENERY
Plop your greenery into the vase and display.

DONE!
How easy was that?

TOTAL PROJECT COST
This project was free for me to make as I already had all of the items, tools and supplies. Can't beat free!

PURCHASING GUIDE
New Leaf Tea bottle = Walgreens
Folk Art Home Decor Chalk Paint = Joann's, Hobby Lobby or purchase online at plaidonline.com

Now that I've taken this picture, I realize I need to paint the shelves. Oh well, another day...


Movement or Religion?

Beck's latest special. He provides evidence that BLM is more of a cult religion than a human rights movement. (10 minute excerpt from 1 hour program.)

July Lunch

Our next lunch for old Abbott friends and friends of old Abbott friends will be at Black Bear Diner on Saturday, July 11th. Same bat-time, same bat-channel. Why? Apart from the good food, no paper straws! Their straws are made from corn. We can take that and run with it...