Monday, November 23, 2020

[Real] Hot Chocolate Gift

I'm a little late in getting the shopping done this year. It's finally all done and now I'm just waiting for everything that I ordered online to arrive. But I can start wrapping a few things while I wait.

I know, I know, another Hot Chocolate gift. But this one doesn't utilize the standard instant hot chocolate gift configuration. I like giving real chocolate.

Here's what I used:

Not much to say here. I just put a little excelsior in the bottom of the bag and an ample amount inside the mug so the chocolate package can sit on top. I slid the recipe in the back and added a cute little bunny ornament on the side. Closed the bag with the twist tie and tied the molinillo onto the bag with the ribbon. 

I originally wanted to insert the handle of the molinillo into the mug and have the whisk portion stick out beyond the bag, but I thought it looked too tall and out of balance. If the mug had been taller, it would have worked out better. But in the end, it works.


I put 2 of these together in about a 1/2 hour. 2 gifts down! Now Mexican Hot Chocolate doesn't typically have marshmallows floating on top, but there's nothing stopping you from including a miniature bottle of dark rum for a drink that will truly warm your gift recipient up! They can top it off with a little whipped cream if they want to dress it up a bit.


Thursday, November 05, 2020

Wood Ring Tealight Holders

Here's another wood ring project for you since I had some left over from the teether project. I wouldn't use regular wax tea lights as this candle holder is wood and has the potential for catching on fire. That wouldn't be good... No, precious. Not good at all. 


  • 3 Wood Rings
  • 1 Wood Disc, 2" diameter
  • Empty Toilet Paper Roll and Tape
  • Glue
  • Battery-operated Tea Light, 1-3/8" / 3.5cm diameter or smaller

PREPARE THE GUIDE: First I made a guide to slide the rings onto to keep them aligned. Take the empty toilet paper roll and cut it up the side. Overlap the ends, slide 2 rings onto it to hold the size while you tape the roll closed.

GLUE THE RINGS: Slide the rings down the guide, gluing each one as you go. Set aside to dry.

ATTACH THE BOTTOM: Glue the disc to the bottom of the ring stack. Let dry.

Done! Insert your tea light candle.

Monday, November 02, 2020

Teether

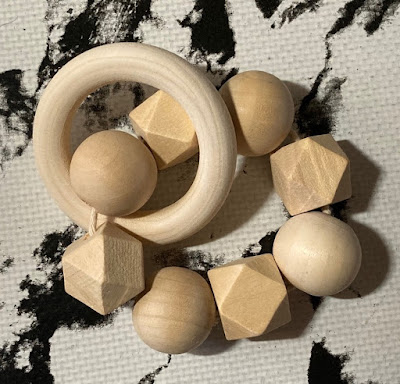
We have a local charity that provides baby items to unwed mothers, so I thought I'd spend my time not only in a productive manner, but one that would actually benefit others on a more practical scale. I found some cute teethers on Pinterest that were made with natural wood beads and decided those would be both cute and useful. There's not much for instruction here, so this post will basically cover the specific beads I used and where to buy them.

Simply thread the beads onto the twine, add the ring and tie off with a square knot. Because I never trust knots, I added a dab of glue and hid the knot inside one of the round beads (they have a bigger hole). Because I was making multiples, to make threading the beads easier, I took a wire stem and folded it in half to use as a bodkin. I used pliers to make the 'loop' narrow so it would easily fit through the beads. If you're only making one, you can just tape the end of the twine to make it stiff.

Obviously, you don't need to use the twine noted - I just included it for reference more than to provide a specific recommendation. I had hoped to use leather lacing, but since the chemicals used to tan leather are toxic, that certainly wasn't an option, unfortunately. Any 100% cotton twine, yarn or cord can be used provided it fits through the holes on the beads.

As the faceted beads come in a bag of 50, I was able to make 12 teethers with plenty of round beads and rings left over for another day or another project. The individual cost works out to be $1.72 each. Word of note though, the faceted beads took about 2 weeks to arrive. The round beads and rings arrived within 1 week.