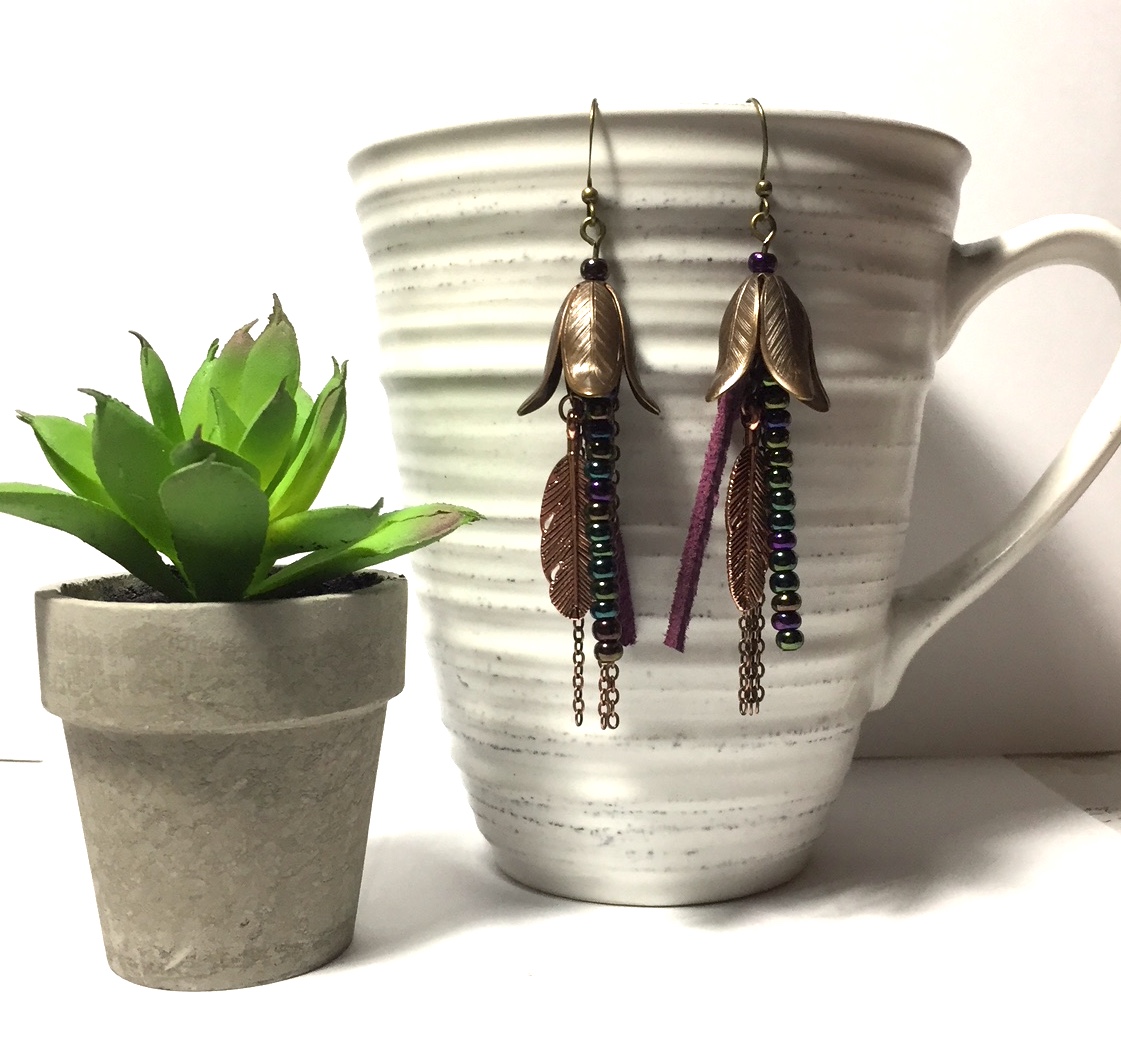
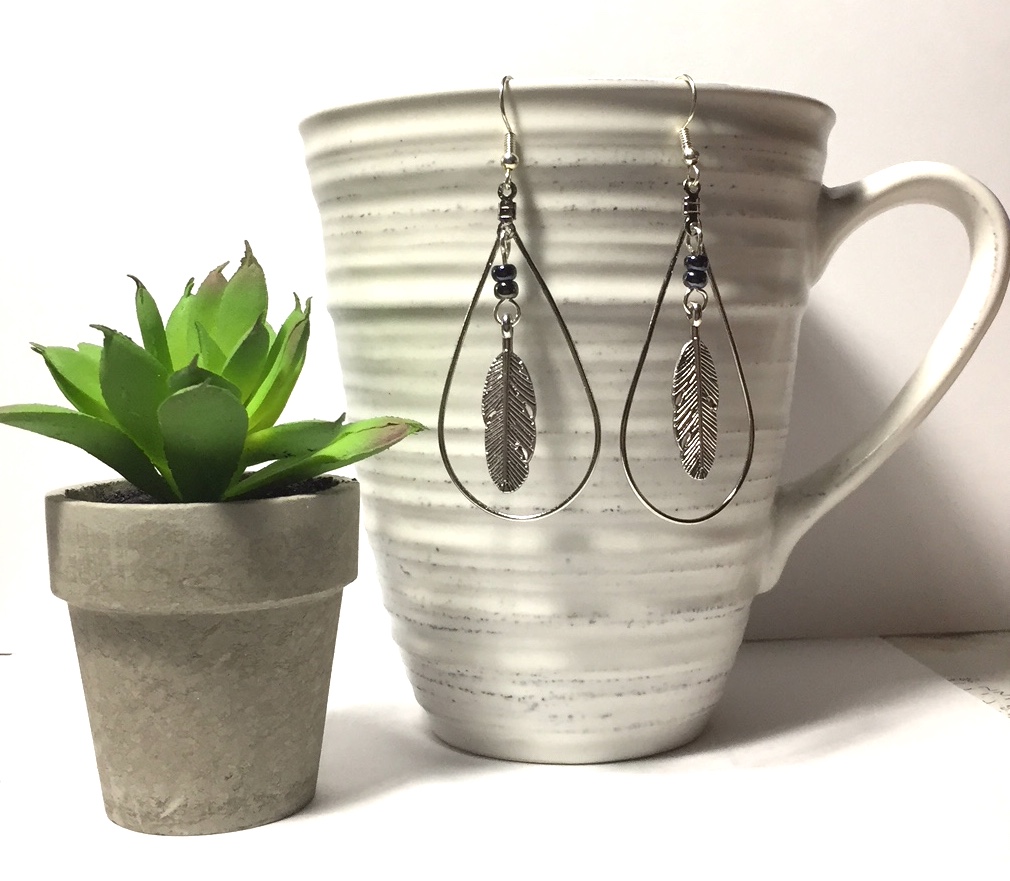
A while back I got on an earring making binge. I do this. I'm all into one type of craft for a while, get bored and switch to another. That was the case here. So here are pics of my earring binge. I did make the earring tree that appears in the last pic. If you're interested, I'll post the tut - just let me know in the comments below.
All jewelry supplies were purchased at Joann's.
Friday, June 19, 2020
Thursday, June 18, 2020
2-Fer!
Last post for the day!
Because I do the layout for our mobile home park magazine, I spend a lot of time on Pinterest looking for craft projects to include. Because we've been locked up due to WuFlu, I've also spent a lot of time on YouTube watching crafting videos - so you had to know a lot of crafting posts were coming.
Here are 2 new projects for you!
PROJECT #1: FRAMED FLORAL DECOR
For this project you will need:
I have a shelving unit in my master bath that needed some sprucing up. I've recently become a bit addicted to the specialty New Leaf teas which happen to come in tall glass bottles. I liked the shape of the bottles and decided they would make cute (and cheap) vases to suit my purpose. You don't have to run out and buy any tea just to get your hands on this bottle, (although I'm very fond of the Black Tea with Lemon and Honeysuckle). Any tall or pretty shaped bottle that strikes your fancy will do just fine.
Because I do the layout for our mobile home park magazine, I spend a lot of time on Pinterest looking for craft projects to include. Because we've been locked up due to WuFlu, I've also spent a lot of time on YouTube watching crafting videos - so you had to know a lot of crafting posts were coming.
Here are 2 new projects for you!
![]() |
| Click to enlarge |
PROJECT #1: FRAMED FLORAL DECOR
For this project you will need:
- One 8"x10" artist canvas
- One plastic sink mat
- White chalk paint
- 1 Flower pick
- A small amount of jute twine
- Flat head screwdriver
- Paint brush
- Staple gun and staples
- Scissors
- Wire Cutters, as needed
I found this small light-duty staple gun at Hobby Lobby in the art / paint section of the store. The regular price was $10.99, but because I always travel with my craft store apps on my phone, I was able to use the 40% off coupon and scored it for $6.60. Since it's light-duty, it's perfect for crafting use and I don't have to drag out the mondo staple gun, (that hurts my wrist), that is better suited to household use or re-upholstering furniture. I'm sure you can find a light-duty staple gun at Home Depot or Lowe's, but they never have coupons and you may get real old waiting for them to go on sale. Anyway, I was anxious to try it out and this project seemed perfect for that. This particular staple gun uses #3 staples. I purchased 5/16" long staples and they worked fine.
![]() |
| Click to enlarge |
Chalk paint comes in either brush-on or spray paint forms. If you're really bored, you can try making your own. I'm way too lazy for that. If you either don't have a Walmart near you or you despise shopping at that store as I do, all craft stores sell chalk paint. But be forewarned, their selections are usually quite picked over. Home Depot also sells it in spray form, as I'm sure does Lowe's. But again, no coupons.
Hobby Lobby Tidbit: If it's not on sale for 50% off this week, it will be on sale for 50% off next week.
Coupon Phone Apps: All craft stores have apps that you can download to your smartphone that include a menu selection for all of their current coupons. If you don't use a smartphone, you can always print out the coupons from their websites before you go. Never ever pay full price unless you just can't wait.
OK - enough yapping. Let's get started.
STEP 1 - PREPARE CANVAS FRAME
Remove the canvas from the frame. The frame is made of pretty soft wood, so some of the staples were a bit embedded. I used a flathead screwdriver to pry them up and out. Toss the canvas unless you have some other use for it.
STEP 2 - PAINT THE FRAME AND SINK MAT
I applied 2 coats to the frame and 3 coats to the sink mat, letting the paint dry completely between coats. No need to paint the back of either unless you are more anal retentive than I am.
STEP 3 - ATTACH THE SINK MAT TO THE FRAME
Turn the frame upside down and staple the mat to the frame (painted side down). I recommend starting at the top center, then bottom center, followed by side centers. Then corners and fill in until the entire mat is taut and evenly stapled all around. End with trimming off the excess mat.
STEP 4 - ATTACH THE FLORAL PICK
Position the floral pick on the sink mat, trimming the stem as needed, until you are happy with the placement. Wrap jute around stem a few times and finish off with a cute little bow. Hot glue the pick to the sink mat.
DONE
Hang or place your new masterpiece!
Note: If I were to make this again, I think I'd use spray paint instead. Painting the sink mat was kind of a pain in the butt trying to keep the paint strokes from [obviously] showing.
TOTAL PROJECT COST (not including tools and paint supplies) - $3.99
Canvas Frame - $1
Sink Mat - $1
Floral Pick - $1.99
PURCHASING GUIDE
Artist Canvas, Sink Mat = Dollar Tree
Waverly Chalk Paint = Walmart
Flower Pick = Hobby Lobby
PROJECT #2: TEA BOTTLE VASES
For this project you will need:
- New Leaf 'Tea House' or 'Organic' Collection bottle(s)
- Mineral spirits or Goo Gone
- Chalk paint in desired color (I used Folk Art Home Decor Chalk Paint in Sheepskin, French Linen and English Lavender)
- Paint brush
- Cardboard from a cereal box
- Jute twine, scrapbooking paper or whatever you want to finish the top
- Assorted greenery picks
- Hot glue
- Scissors
I have a shelving unit in my master bath that needed some sprucing up. I've recently become a bit addicted to the specialty New Leaf teas which happen to come in tall glass bottles. I liked the shape of the bottles and decided they would make cute (and cheap) vases to suit my purpose. You don't have to run out and buy any tea just to get your hands on this bottle, (although I'm very fond of the Black Tea with Lemon and Honeysuckle). Any tall or pretty shaped bottle that strikes your fancy will do just fine.
The labels were easy to peel off in one piece, however removing the adhesive that was left behind was a wee bit challenging. I tried soaking in soapy hot water - nope. Acetone - nope, that just smeared it around. I didn't have any Goo Gone handy, but I did have some mineral spirits and Bingo! I don't know what adhesive they use, but I want some!
OK - let's go.
STEP 1 - PREPARE BOTTLE(S)
Remove labels and adhesive, then wash and dry.
STEP 2 - PAINT BOTTLE(S)
Apply 2-3 coats for complete coverage. Let dry completely between coats. No need to paint the screw top area as you will be covering it up in Step 3.
STEP 3 - CREATE BOTTLE TOP COVER
Measure screw top area of bottle and cut a strip of cardboard to cover. Wrap strip tightly around the screw top and glue closed. Remove cover and finish with your embellishment of choice. Slide finished cover onto bottle.
STEP 4 - INSERT GREENERY
Plop your greenery into the vase and display.
DONE!
How easy was that?
TOTAL PROJECT COST
This project was free for me to make as I already had all of the items, tools and supplies. Can't beat free!
PURCHASING GUIDE
New Leaf Tea bottle = Walgreens
Folk Art Home Decor Chalk Paint = Joann's, Hobby Lobby or purchase online at plaidonline.com
![]() |
| Now that I've taken this picture, I realize I need to paint the shelves. Oh well, another day... |
Movement or Religion?
Beck's latest special. He provides evidence that BLM is more of a cult religion than a human rights movement. (10 minute excerpt from 1 hour program.)
July Lunch
Our next lunch for old Abbott friends and friends of old Abbott friends will be at Black Bear Diner on Saturday, July 11th. Same bat-time, same bat-channel. Why? Apart from the good food, no paper straws! Their straws are made from corn. We can take that and run with it...
Canning Jar Air Freshener
Another easy-peasy project that has a purpose in addition to being decorative!
What you'll need for this project:
- 1 pint-sized (16 oz.) canning jar or jar of your choice
- Chalk paint - I used Folk Art in Patina
- Clear wax
- 1 hydrangea blossom or 3 Dollar Tree hydrangea stems
- Floral tape, as needed, for hydrangea stems
- Paint brush
- Wire cutters
- Medium to Coarse sandpaper
- 1 bag Sure Scent beads
I had purchased hydrangea stems from Dollar Tree online with the intent of holding a crafting class at our park. Then the virus hit and the class had to be cancelled. Since ordering online at Dollar Tree requires you to place bulk orders, I had a ton of these stems on hand. To make them look like actual hydrangea blooms instead of nondescript random white flowers, I cut the flower stems from the main stem of 3 of them, then bundled the individual stems together with floral tape.
Ready? Here we go!
STEP 1 - CLEAN & PAINT JAR
Wash and dry jar thoroughly. Apply 3 coats of paint, allowing to dry between coats. Finish off with a coat of wax. The wax acts as a sealant and provides a soft sheen. Allow to dry for 24 hours, then buff with a soft cloth.
STEP 2 - DISTRESS
Using sandpaper, go over all raised edges to distress.
STEP 3 - PREPARE STEMS
If you're also using Dollar Tree stems, assemble as described above. If you have purchased a bloom, simply cut the stem down to fit the jar.
STEP 4 - ADD SCENT BEADS
I suggest doing this over a sink to prevent the 'juice' from spilling onto an unwanted surface. Open the bag and pour the beads into the jar. Insert the hydrangea.
DONE!
Place wherever you need a breath of fresh air!
PROJECT COST (minus paint supplies & tools)
Jar: Free - already had
Hydrangea Stems: $3
Scent Beads: $1
Total cost of project: $4
BUYING GUIDE
All items were purchased at Dollar Tree.
Note: Sure Scent beads come in either bags or jars. If the bags aren't available at your local Dollar Tree, I'd recommend picking up 2 of the jars as they don't contain as many scent beads as the bags do.
Ready? Here we go!
STEP 1 - CLEAN & PAINT JAR
Wash and dry jar thoroughly. Apply 3 coats of paint, allowing to dry between coats. Finish off with a coat of wax. The wax acts as a sealant and provides a soft sheen. Allow to dry for 24 hours, then buff with a soft cloth.
STEP 2 - DISTRESS
Using sandpaper, go over all raised edges to distress.
STEP 3 - PREPARE STEMS
If you're also using Dollar Tree stems, assemble as described above. If you have purchased a bloom, simply cut the stem down to fit the jar.
STEP 4 - ADD SCENT BEADS
I suggest doing this over a sink to prevent the 'juice' from spilling onto an unwanted surface. Open the bag and pour the beads into the jar. Insert the hydrangea.
DONE!
Place wherever you need a breath of fresh air!
PROJECT COST (minus paint supplies & tools)
Jar: Free - already had
Hydrangea Stems: $3
Scent Beads: $1
Total cost of project: $4
BUYING GUIDE
All items were purchased at Dollar Tree.
Note: Sure Scent beads come in either bags or jars. If the bags aren't available at your local Dollar Tree, I'd recommend picking up 2 of the jars as they don't contain as many scent beads as the bags do.
I Snuck a Massage
Well, 'snuck' is an exaggeration. I was driving down Florida St. and noticed a banner announcing chiropractic, acupuncture and massage therapies. Since the place I normally go to was still closed and busy making useless masks, (because anyone with half a neuron knows you can catch the virus through your eyes), I jotted down the phone number and betrayed Hands of Mercy.
I was a bit disappointed with the massage, (she needs to go back to school and learn how to massage heads and feet), but as I was lying there, I recalled that chiropractic treatments cured me of migraines several years ago and decided to book an appointment for my back on my way out. It definitely couldn't hurt and I'm sick and tired of the back and leg pain. Considering I'm not getting anywhere with my doctor - who just prescribes 600mg ibuprofen that doesn't do diddly squat - I certainly couldn't get any worse.
I've had two adjustments so far and I've experienced a little bit of progress. I can stand / walk a teeny bit longer than usual, so I'm hopeful. He developed a treatment plan, which I've never had before with any chiropractor I've seen, so that's encouraging as well. I'm all out of whack from my neck to my lower back so he's recommending 2 adjustments per week for 6 weeks followed by maintenance visits after. I'm game. I'll let you know how it goes from here.
I was a bit disappointed with the massage, (she needs to go back to school and learn how to massage heads and feet), but as I was lying there, I recalled that chiropractic treatments cured me of migraines several years ago and decided to book an appointment for my back on my way out. It definitely couldn't hurt and I'm sick and tired of the back and leg pain. Considering I'm not getting anywhere with my doctor - who just prescribes 600mg ibuprofen that doesn't do diddly squat - I certainly couldn't get any worse.
I've had two adjustments so far and I've experienced a little bit of progress. I can stand / walk a teeny bit longer than usual, so I'm hopeful. He developed a treatment plan, which I've never had before with any chiropractor I've seen, so that's encouraging as well. I'm all out of whack from my neck to my lower back so he's recommending 2 adjustments per week for 6 weeks followed by maintenance visits after. I'm game. I'll let you know how it goes from here.
Wednesday, June 17, 2020
Beaded Wreath
![]() |
| Click to enlarge |
I found this wreath on Pinterest and really liked it because it was different from the run-of-the-mill floral and mesh wreaths. This was my inspiration picture:
Looked easy enough!
Here's what you'll need for this project:
- 12" metal ring (Joann's)
- 1" / 25mm wood beads (Amazon)
- Assorted greenery and focus flowers (I used Lamb's Ear from Walmart; Pussy Willows and Magnolias from Michaels)
- Hot glue
- E6000 glue
- Small bolt cutters
- Wire cutters
- Leather strap
- Leather hole punch
- Medium Nickel Rivets
- Pliers
I first purchased my beads at Michaels, but afterward found them on Amazon for a whole lot less! You can find the stained beads here and the natural beads here. For a 12" ring, you'll need about 45 beads. I used the stained beads as I thought the natural beads would look a bit washed out when hung against a lighter background.
The metal ring is about 5/16" thick, so you'll need bolt cutters to cut the ring apart in order to slide the beads on. I had to purchase bolt cutters and found that the 14" cutters worked just fine. Home Depot has them for varying prices starting around $20 and going on up. That said, if there's a man in your life, you can always sneak into his tool bin and abscond with them. Sure, you can ask, but it's more fun to sneak. If you don't have a man in your life, ask a neighbor or go buy your own.
This is a slightly pricey project as I've made it, but you can save some bucks by purchasing some of your items elsewhere. For instance, check out the Dollar Tree for flowers and greenery. You can save quite a bit just there. I wanted magnolias and they just didn't have them there, so I had to get those at a craft store. Additionally, use those coupons even if you have to make multiple trips.
The Hanger: I had a leather strap on hand that I had purchased for another project. You can save some bucks by hitting the thrift store and buying a man's plain leather belt or if you have an old leather purse, cut a strap from it. It will be a lot cheaper than paying $12.99 for the strap at the craft store. Alternatively, you can use leather lacing to make a loop hanger or simply hang it without one. Up to you. I also had a rotary leather punch, but again, you can save some bucks by buying a single punch if you don't think you'll have a need for multiple hole sizes down the road. Single punches can be purchased online at Tandy Leather. Just add a rubber mallet and a scrap block of wood to the tools needed.
Gluing Tip: This wreath can be made using only hot glue if you plan to hang it inside. But if you live in a hot climate, you shouldn't hang the wreath outside as the glue will likely melt in the summertime. If you want to hang it outside, here's a tip:
Since E6000 takes a while to set, make your wreath using hot glue. When done, flip the wreath over and liberally apply E6000 to all contact points, making sure you're not using so much glue that it seeps to the front. Let set overnight and you're good!
OK - let's make a wreath!
STEP 1 - PREPARE THE METAL RING
Find the joint and cut the ring using your bolt cutters. Now sneak back to the tool bin and replace them. He'll never know!
STEP 2 - ADD BEADS
Slide the beads onto the ring until full. If you end up with a stub on the ring that isn't long enough for another bead, apply some hot glue to the ring, slide on another bead, then glue the beginning and ending beads together.
STEP 3 - ARRANGE AND GLUE GREENERY
Cut flowers from main stem. Glue to wreath.
Cut stems of Lamb's Ear from the main stem. Arrange, trimming as needed, Glue in place.
Cut stems of Pussy Willows. Arrange, again trimming as needed. Glue in place.
STEP 4 - MAKE AND ATTACH THE STRAP HANGER
Fold leather strap over beads allowing a length to extend beyond the wreath. Mark for cutting. Remove from wreath and fold again, making sure the front strip extends past the back strip a bit (so the edges won't be even). Using a pen, mark for hole placement. You'll need one hole on the front of the hanger and two holes in the back. The top hole in the back will be the hole used for hanging.
Once the holes are punched, wrap around the beads and insert the rivet. Press together until you feel it 'snap'. Cover the rivet - both front and back - with some heavy fabric or paper towel folded a few times so it's thick. Press rivet together with the pliers to set. You don't need to apply a lot of pressure to set, so use a light to medium touch. If you press too hard, you can damage the rivet and it won't look very good.
Now find the perfect place to hang your beautiful wreath!
TOTAL PROJECT COST (without coupons)
Metal Ring: $2.99
Beads: Stained: $18.39 Natural: $15.99
Lamb's Ear: $1.99
Magnolia Bush: $5.99 (on sale - normally $14.99)
Pussy Willow Stem: $6.99
Total Cost: $36.35
Hanger (without coupons)
Leather Strap: $12.99
Rivets: $6.99
Total Cost: $19.98
Grand Total: $56.33 with stained beads or $53.93 if using natural beads. Again, total cost does not reflect the use of coupons or less expensive alternatives for supplies. Also, you will have most materials left over that will allow you to make more than one which will pretty much halve the cost.
Monday, May 18, 2020
Coronavirus, C-19, WuFlu...
Are we freaking having fun yet?
The situation around the country is becoming ludicrous, to say the least. Little Hitlers have popped up everywhere, and of course, that includes here in the good ole Republik of Kalifornia. But what else would you expect of Nancy Pelosi's nephew anyway, huh?
And don't go getting excited about Elon Musk. He has always described himself as a socialist. And yes, he did tweet about taking a Red Pill, but the red pill he's referring to is the one from the Matrix. One can argue that they're the same, but one is a fantasy and the other is not. He also ended that tweet with the [social media]-recognized symbol for socialism. He's just a die-hard socialist that had one taste of what socialism truly means. He's still living the Utopia dream.
IT'S NOT ABOUT THE VIRUS
So I can go into a Wal-Mart or a Target, be exposed to who knows who with who knows what, but I can't go to church or out to breakfast. Explain to me how the exposure to people in Wal-Mart is different than exposure to people in a restaurant or at church? There is evil afoot and it's not because of the virus.
When we let out known child molesters and five policeman gang up on a mother and bring her to the ground for wearing her mask incorrectly - in front of her toddler, I might add - you know we're not dealing with sane people with sane policies.
When it has been proven that the virus dies within five minutes of being exposed to sunlight, but they're filling up skate parks with sand and arresting a lone surfer, you know it's not about the virus.
When they form teams of people to go door-to-door to test the population to find out if they're infected, and then removing people from their homes because they only have one bathroom, you know it's not about the virus.
When you have governors threatening to extend the lockdown if you do X, Y or Z, you know it's not about the virus.
When other states are adjusting their death counts to reflect 'those that died from COVID" vs. 'those that died with COVID' and the C-19 death counts are reduced by the hundreds, you know it's not about the virus.
And on and on it goes...
We're shutting down the economy over a virus that, as it stands today, has a 99.5% recovery rate. Yet as we learn new and good things about the situation, we have governors extending lockdowns until August. Why?
NEVER LET A GOOD CRISIS GO TO WASTE.
The globalists, which include virtually all far-left Democrats, some moderates and some greedy Republicans, are desperate to usher in the New World [Moral] Order. They've been working on it since the end of WWII. Don't believe me? Here's a map drawn up by the U.N. that demonstrates their goal.
The situation around the country is becoming ludicrous, to say the least. Little Hitlers have popped up everywhere, and of course, that includes here in the good ole Republik of Kalifornia. But what else would you expect of Nancy Pelosi's nephew anyway, huh?
And don't go getting excited about Elon Musk. He has always described himself as a socialist. And yes, he did tweet about taking a Red Pill, but the red pill he's referring to is the one from the Matrix. One can argue that they're the same, but one is a fantasy and the other is not. He also ended that tweet with the [social media]-recognized symbol for socialism. He's just a die-hard socialist that had one taste of what socialism truly means. He's still living the Utopia dream.
IT'S NOT ABOUT THE VIRUS
So I can go into a Wal-Mart or a Target, be exposed to who knows who with who knows what, but I can't go to church or out to breakfast. Explain to me how the exposure to people in Wal-Mart is different than exposure to people in a restaurant or at church? There is evil afoot and it's not because of the virus.
When we let out known child molesters and five policeman gang up on a mother and bring her to the ground for wearing her mask incorrectly - in front of her toddler, I might add - you know we're not dealing with sane people with sane policies.
When it has been proven that the virus dies within five minutes of being exposed to sunlight, but they're filling up skate parks with sand and arresting a lone surfer, you know it's not about the virus.
When they form teams of people to go door-to-door to test the population to find out if they're infected, and then removing people from their homes because they only have one bathroom, you know it's not about the virus.
When you have governors threatening to extend the lockdown if you do X, Y or Z, you know it's not about the virus.
When other states are adjusting their death counts to reflect 'those that died from COVID" vs. 'those that died with COVID' and the C-19 death counts are reduced by the hundreds, you know it's not about the virus.
And on and on it goes...
We're shutting down the economy over a virus that, as it stands today, has a 99.5% recovery rate. Yet as we learn new and good things about the situation, we have governors extending lockdowns until August. Why?
NEVER LET A GOOD CRISIS GO TO WASTE.
The globalists, which include virtually all far-left Democrats, some moderates and some greedy Republicans, are desperate to usher in the New World [Moral] Order. They've been working on it since the end of WWII. Don't believe me? Here's a map drawn up by the U.N. that demonstrates their goal.
![]() |
| Click to enlarge |
Agenda 21, rewritten to become Agenda 2030, is the documented plan. Again, don't take my word for it, go to the UN website. The year 2030 is their goal for achieving their utopia. Now you know why AOC kept going on about 'we've only got 10 years left!".
Now the globalists weren't making much headway in the U.S. where open borders, gun control and climate change laws were concerned. At least not fast enough. THEN, interestingly enough, and one month BEFORE the virus was known to have hit the U.S., Bill Gates and company sponsored a war-gaming event with all of the same players as for climate change. All progressive, all globalists. The war game was to determine what to do in the event of a global pandemic. Coincidence? It's so very hard to think that it's not. This war game was called Event 201. Look it up. This is where they decided on who the 'authoritative truths' would come from. Well, lookie here. It's WHO. You know, the UN group that originally told us that the virus could not be transmitted from human-to-human at the onset? The same group that said masks were ineffective, then changed their story a couple of months later? Who spread Chinese propaganda that the US Marines were responsible for bringing the virus to China? Yep, great puppets they'll make against that rebellious country that won't give up their guns and give in to the climate change B.S. So what would work? Well, crushing the economy will work. Keeping people ginned up with fear is also helpful. Scared people will let you do most anything. Hungry people, even more.
And then there's the whole Bill Gates vaccination that's primary purpose is to track people, with anything that's actually beneficial to the person being the secondary concern. The FDA has put a hold on it. For now.
Google and Apple are also promising to deactivate their tracking phone programs once the crisis is over. Apple has always been better about privacy than Google ever was, but since Google developed the app that China uses to track all of their citizens for 'social compliance', I don't trust them one whit. Apple either at this point, and if you know me at all, you know that was hard for me to say.
So here we are. When the virus thing is ramping down, the Hitlers are ramping up. There's a reason for it. Think what you will. I trust no one at this point.
Coming up next... Gay frogs falling out of the sky.
Saturday, June 29, 2019
To My Ravelry Friends
It appears that Ravelry has jumped on the idiotic bandwagon and has become political. They are now banning any posts related to Trump and his administration due to their 'undeniable white supremacy'.
Now where did they get that idea?
Well, if you're a Ravelry user and click on the link at the bottom of their policy, it will take you to a similar policy set up by an RPGer. This RPGer is a known troll and Trump hater. Since that's as far as Ravelry has appeared to have taken their investigation, it is lacking at best.
Some of you know me and know my politics. I have never felt it appropriate to take those politics anywhere outside of my personal blog and [now defunct] Facebook page. Why? Because that's Rule #1 - never discuss politics or religion with acquaintances or strangers. Politics has no place outside of close like-minded friends or the family dinner table. Secondly, I'd never support a white supremacist. Period.
Ravelry did not learn Rule #1. They have now alienated approximately half of their membership by calling them all white supremacists. And they've said nothing about leaving patterns or posts up that insult Trump in the most vulgar language.
Tolerance is not supporting those you agree with. That's easy and takes no effort. Tolerance is supporting those you don't agree with. Otherwise, you're either simply in agreement and / or not being tolerant.
There is zero evidence to support their claims of white supremacy. Does Trump make it harder for those who support him when he opens his face? Sometimes, most certainly. He's a brash New Yorker and I take him as that. And those that do the same are able to read between the lines.
So with that said, I'm leaving Ravelry. I'll be leaving my patterns up for one week, then they're gone. Too bad they had to go and get stupid.
https://www.ravelry.com/stores/julieann-thornton-designs
In the meantime, I'm going to consider if setting up a crochet group of my own is something I want to invest time in again. Should I decide to go there, I'll post with details.
Yarn on!
Now where did they get that idea?
Well, if you're a Ravelry user and click on the link at the bottom of their policy, it will take you to a similar policy set up by an RPGer. This RPGer is a known troll and Trump hater. Since that's as far as Ravelry has appeared to have taken their investigation, it is lacking at best.
Some of you know me and know my politics. I have never felt it appropriate to take those politics anywhere outside of my personal blog and [now defunct] Facebook page. Why? Because that's Rule #1 - never discuss politics or religion with acquaintances or strangers. Politics has no place outside of close like-minded friends or the family dinner table. Secondly, I'd never support a white supremacist. Period.
Ravelry did not learn Rule #1. They have now alienated approximately half of their membership by calling them all white supremacists. And they've said nothing about leaving patterns or posts up that insult Trump in the most vulgar language.
Tolerance is not supporting those you agree with. That's easy and takes no effort. Tolerance is supporting those you don't agree with. Otherwise, you're either simply in agreement and / or not being tolerant.
There is zero evidence to support their claims of white supremacy. Does Trump make it harder for those who support him when he opens his face? Sometimes, most certainly. He's a brash New Yorker and I take him as that. And those that do the same are able to read between the lines.
So with that said, I'm leaving Ravelry. I'll be leaving my patterns up for one week, then they're gone. Too bad they had to go and get stupid.
https://www.ravelry.com/stores/julieann-thornton-designs
In the meantime, I'm going to consider if setting up a crochet group of my own is something I want to invest time in again. Should I decide to go there, I'll post with details.
Yarn on!
![]() |
| Click to enlarge for reading |
Subscribe to:
Posts (Atom)